Menu
Your Cart

Mauch Mauch Sensor Hub X8

Mauch Mauch Sensor Hub X8
163.85€
Brez DDV: 163.85€
  • Zaloga: V zalogi
  • Model: MAU2-013
1 prodano
280 views
Oznake: Mauch , Mauch , Sensor , Hub , X8

The Sensor Hub X8 collects the current measurements from up to eight Power-Cube current sensors. The currents are summed up and passed to the Pixhawk flight controller via the Power-Cube power supply. The voltage measurement of the LiPo packs is measured separately by the Power-Cube.

An OLED display indicates the number of current sensors, and whether each current is within range of the average current of all monitored batteries. Can be connected to an external OLED display for easier visibility on vehicle.

Requires a Mauch Power-Cube power supply and Mauch Power-Cube current sensors. All sensors must have the same current rating (100A or 200A).

Includes:

  • 1x   Sensor Hub X8
  • 8x   Connection cable to current sensor PC-100 or PC-200 / L = 200mm
  • 1x   Alarm output cable and external Reset / Restart / L = 200

Description

Every MAUCH product is manufactured and thoroughly bench tested using MAUCH’s rigorous process.

X8 test board

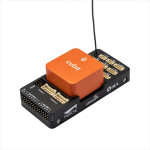
SENSOR HUB X8 TEST BENCH, INCLUDING PIXHAWK 2.1, POWER-CUBE AND 8X PC SENSORS


Mounting

The Sensor Hub X8 can be either installed via double side tape, or screwed down to the main frame, by removing the 4 bottom M3 screws and drilling holes into the frame. Then reinstall the screws trough the frame. -> The original screws will be too short, so please replace them with longer ones according your frame thickness.


Setup and Operating Description

SENSOR HUB X8 WIRING


1. Connection to Power-Cube:

CABLE PROVIDED WITH POWER-CUBE (NOT SENSOR HUB X8)

 
  • Connect the “To P-C current sensor” cable from the Power-Cube to the Sensor Hub X8’s “To Power-Cube” connector (label 1 on the wiring diagram above).
    • This connection carries the power supply for the Hub X8 as well as the connected current sensors.
    • The voltage is 4.95-5.05V and the max. current should not exceed 0.5A. The current draw of the Hub X8 (with active OLED) is 50mA, plus 8x 15mA (current sensors) = 170mA (0.17A). With two Sensor Hub X8 and 16 current sensors, plus an Hub X2 (15mA), the current draw is still below the 0.5A.
      (2 x 0.17A) + 0.015A = 0.335A.
 

2. Sensor connectors:

POWER-CUBE CURRENT SENSOR PC-200. (PC-100 ALSO COMPATIBLE)


Connect the PC-100 or PC-200 sensors to the sensor connectors (label 2). All sensors must have the same current rating.

If you use fewer than 8 sensors, the sensors can be connected to any sensor port.

For more details, please check item (9) below.

  • The 8 cables to connect the PC sensor boards come together with the Hub X8 (L=200mm).
  • Only PC-100 or PC-200 (Power-Cube) sensors can be used. The Hub X8 is not compatible with HS-xxx-xx sensors!


DISABLE UNUSED SENSORS BY DISCONNECTING THE GROUND WIRE


If all 8 possible sensors are installed, but you want to fly your UAV with only 4 LiPos, then you can deactivate the unused current sensors by either disconnecting them from the Hub X8, or installing a switch into the GND wire of the sensor board.

REM: Do not install the switch on the + 5V or I-out cable!

If the sensor is disconnected, or the GND wire is switched off, then the Hub X8 will deactivate the sensor input during boot up or restart.

3. Reset / Restart:

In case of any alarm (over current or under current) a reset can be performed by either:
  • re-powering the Hub X8; or
  • pressing the reset switch for a short time.

If the reset switch is pressed longer than 2 seconds, then the Hub X8 will restart. This is helpful to deactivate installed sensors after switching on the system.
It is possible to install an external reset / restart switch (not included); the necessary 5p cable with connector is included with
2x red for external switch + 3x white for alarm relays output (label 5 on diagram).

4. Status LED:

RED = During startup / Any alarm is active and the alarm relays is ON / If the Reset – Restart switch is pressed.
GREEN = After boot up and all connected sensor are initialized / No active alarm.
 

5. Alarm Out:

  • Pin 3 = P -> The middle contact of the relays.
  • Pin 4 = NO (normal open).
  • Pin 5 = NC (normal closed).

Any power LED or buzzer can be connected here, but the maximum current should not exceed 1A!
The necessary 5p cable with connector is included. -> 2x red for external switch + 3x white for alarm relays output.

6. External LCD / OLED display:

SENSOR HUB X8 WITH EXTERNAL OLED DISPLAY (NOT INCLUDED)


If the Hub X8 is installed in a place where the display isn’t visible, then you can connect on connector “Ext. Display” a standard 2×16 LCD display (4 bit data bus). Do not use the Sensor Hub X8 to power an LCD display with back LED light, as these lights can easily draw more than 200mA and the supplied power from the Power-Cube might not be enough.
You also can install an 2×16 / OLED display directly. The current draw of these displays is minimal (30mA). -> Internal and External display can be active.
REM: External OLED displays with CFK cover and reset switch might be available soon. Please check item (7) below, for how to activate / deactivate the internal and external displays.
 

7. Setup DIP switch:

S1          S2
OFF      OFF      Internal and external display OFF
OFF      ON        Internal display ON /  External display OFF
ON        OFF      Internal display OFF /  External display ON
ON        ON        Internal and external display ON
 
S3          S4          S5           S6
ON        OFF       OFF       OFF     50A Sensors (PC-050 Sensors coming soon)
ON        ON         OFF       OFF     100A Sensors
ON        ON         ON         OFF     200A Sensors
ON        ON         ON         ON       400A Sensors (PC-400 Sensors are expected to be available at the end of 2017)
 

8. I2C connector:


9. Sensor status indicator:

The numbers 1 to 8 correspond to the current sensors and the symbols above each number indicate the status.
_   = No sensor connected or sensor deactivated -> See Pos. (2)
II  = Sensor connected and current is close to average of the other measured currents.
L   = The current of this sensor is at least 25% lower than the average current of the other sensors -> Alarm relay active.
H  = The current of this sensor is at least 25% higher than the average current of the other sensors -> Alarm relay active.

10. Sensor indicator:

Indicates how many current sensors are connected/active and the current range of the individual sensor. (Label 10)

11. Current display:

The display will show the sum of the currents of all enabled sensors, based on the standard Amp/Volt settings -> See item (12) below.

12. Current output and setup Mission Planner:

The output voltage range from the Sensor Hub X8 is always scaled to be 0.0-3.3V to represent 0A to full current on all sensors, regardless of how many sensors are connected/active. This ensures that the full range of the FC analog input is used, in order to get the most accurate current readings as well as capacity consumption calculation.
For example:
  • 4 x 100A Sensors = 0.0V @ 0A and 3.3V @ 400A    -> Amp/Volt value = 120
  • 5 x 200A Sensors = 0.0V @ 0A and 3.3V @ 1000A  -> Amp/Volt value = 300
  • 8 x 200A Sensors = 0.0V @ 0A and 3.3V @ 1600A  -> Amp/Volt value = 480
 
Please follow this procedure to setup the correct Amp/Volt value in Mission Planner: http://ardupilot.org/copter/docs/common-mauch-power-modules.html
 
Standard values for Amp/Volt:

AMP/VOLT VALUES FOR SENSOR CURRENT RATING (LEFT) AND NUMBER OF SENSORS (TOP)


Napišite mnenje

OPOMBA: HTML koda se ne prevaja!
Slabo Dobro
Captcha

Poiščite izdelek, ki ga želite, in ga dodajte v košarico. Odprlo se vam bo okence, ki vam ponudi dve možnosti – da nakupujete naprej ali zaključite nakup. Izberite tisto, kar vam ustreza.

Ko boste izbrali vse, kar potrebujete, natančno preglejte košarico, nato pa kliknite na gumb »nadaljuj na vnos podatkov«. Izberite med opcijami: fizična ali pravna oseba. Najprej boste morali vnesti podatke, glede na to, ali ste fizična oseba ali podjetje. V primeru, da naročate oz kupujete kot pravna oseba, torej podjetje registrirano v Sloveniji kot tudi EU, velja da vnesete sledeče:

  • Naziv podjetja
  • Točen naslov podjetja
  • Davčna številka
  • Obvezna telefonska številka (dostavna služba)

Izberite način plačila:

  • Po povzetju
  • TRR
  • Paypal
  • Leanpay

Čisto na koncu pozorno preberite podatke o vašem naročilu in potrdite svojo izbiro.

V roku 1-3 delovnih dni bo paket prispel na vaš naslov.

Izdelke dostavlja dostavna služba GLS. Ob dostavi vas bo poklical dostavljavec dostavne službe GLS in se z vami dogovoril za prevzem paketa. Paket bo dostavljen na naslov, ki ste ga navedli ob naročilu.

Izbirate lahko med tremi načini plačila:

  • Preko spletne banke oz. po predračunu
  • PayPal*
  • Plačilo po povzetju
  • Lean pay

Če je vrednost paketa manjša od 50€, dostava po Sloveniji preko dostavne službe znaša 5,90€. Pri nakupu nad 50€ je dostava po Sloveniji brezplačna.

Znesek dostave se obračuna pri zaključku nakupa.

Žal se popusti in ugodnosti v naši spletni trgovini ne seštevajo. Ob naročilu lahko uporabite le eno kodo za ugodnost.

Če želite opraviti postopek vračila, vas vljudno prosimo, da izpolnete obrazec tukaj.

Če v 15 dneh od nakupa stranka ugotovi, da izdelka ne želi iz kakršnega koli razloga, izdelek prinese do nas v original embalaži, nepoškodovanega, NEAKTIVIRANEGA z računom. V takšnem primeru stranki vrnemo kupnino.

Če v roku 15 dni od nakupa stranka ugotovi, da je z izdelkom (dronom) karkoli narobe, izdelek prinesete do nas oz. vrnete v originalni emabalaži z vso vsebino, ki je bila v njej. V takšnem primeru stranki dron zamenjamo z novim. Vračilo izdelka je možno v originalni embalaži, nepoškodovano, z računom.

Po pretečenih 15 dneh steče garancijski postopek. Izdelek pošljemo na DJI pooblaščeni uradni servis. V roku 7-10 delovnih dneh prejmemo zamenjan izdelek.

Garancija prične veljati od aktivacije drona in ne od nakupa le-tega. Za uveljavljanje garancije ne potrebujete računa.

Servis pri pooblaščenem serviserju za DJI drone traja od 7-10 delovnih dni. Ker ima DJI visoke standarde varnosti , drone menjajo za nove in jih ne popravljajo.

Da, lahko se oglasite v naši prodajalni, kjer vam bomo z veseljem pomagli in predstavili izdelek.

Za izposojo izdelkov prosim pojdite na našo spletno stran: rent.onedrone.com/store oziroma se oglasite v naši prodajalni.

Kontaktirajte nas in zagotavljamo vam, da boste prejeli vse potrebne informacije.

Pokličite nas na številko: 041 688 150

Ali pa nas kontaktirajte preko e-pošte: info@onedrone.si